




Detect Sensitive Data with Cribl Background Detection
Background detection is an AI-driven part of Cribl Guard that samples data in your Pipelines, scans it for sensitive data patterns, and surfaces findings. You then review findings, ignore them, or mitigate them by adding Guard rules. Background detection runs as part of Cribl Guard, so there is no separate feature to enable or disable.
Background detection also runs a preliminary scan before you enable Guard, so the Guard homepage can show you where sensitive data already reaches your Destinations and nudge you to enable protection.
Background detection works in two stages:
- Preliminary scan (before you enable Guard): Cribl Guard runs a lightweight scan that shows the amount and type of sensitive data reaching a Destination, even before you enable protection. Use this preliminary scan to see what Guard would catch, then enable Guard where it matters.
- Full background detection (after you enable Guard): Once Guard protects a Destination, background detection samples more data and produces detailed findings, including sampled events and recommended actions.
Background detection workflow at-a-glance:
- Review the preliminary scan results on the Guard homepage to see where sensitive data reaches your Destinations.
- Enable Cribl Guard on the Destinations where you want full protection and detection, then Commit & Deploy.
- Review and act on findings from the Guard page (create rules, mark mitigated, or ignore).
- Review the recommended actions that Cribl generates automatically for each detection, and apply them.
- Optionally refine scope per Pipeline when needed.
Before You Start
- Environment: Background detection is available only in Cribl Stream, in the following deployment types:
- Hybrid environments with Cribl-managed Cloud Workers (AWS-hosted Cloud Worker Group).
- Cribl.Cloud-only environments (AWS-hosted Cloud Worker Group).
- On-premises deployments.
- The preliminary scan runs without enabling Guard. It is available only in Cribl.Cloud environments with Cribl-managed Cloud Workers, not in hybrid or on-premises deployments. Full background detection runs once Cribl Guard protects a Destination. Choose the AI model it uses from the Detection model drop-down at the top of the Guard page.
- Outbound connectivity: Your Leader Node must reach
ai.cribl.cloudover outbound HTTPS to download the Named Entity Recognition (NER) model bundle and to send anonymized usage analytics. No event data or sensitive values are sent to this endpoint (see Data Privacy). In air-gapped or restricted-network environments, allowai.cribl.cloudin your firewall or proxy. In Cribl.Cloud Government, background detection never contactsai.cribl.cloud. Cribl delivers the approved model bundle inside the FedRAMP boundary and collects no AI usage analytics.
How Background Detection Works
Background detection runs inside your Cribl environment, and no event data leaves that environment for inference. After you enable Guard, full background detection runs entirely on your Cribl Stream Worker Nodes. Detection runs in a separate process from your Pipeline processing, so it does not block your data-flow Worker Processes. The Cribl NER model runs locally on each Worker Node. For the preliminary scan, Worker Nodes capture the sampled events and inference runs on the Leader Node.
Cribl downloads the detection model bundle from ai.cribl.cloud to the Leader Node, which then distributes it to your
Worker Nodes. For the connectivity this requires, see Before You Start.
Sampling
Background detection samples 1 in every 10 events. The sampling rate is fixed and not configurable, which keeps detection coverage consistent without overwhelming Worker Node resources. Cribl stores sampled events temporarily on the Worker Node and removes them automatically.
Data Privacy
Your event data never leaves your Cribl environment. All sampling, scanning, and NER inference happen inside that environment. No event data is sent to Cribl or any external service for inference.
Cribl never receives your raw events, sampled events, detected values, or Pipeline names. Background detection
communicates with ai.cribl.cloud for two purposes only:
- Model bundle download: Your Leader Node downloads the NER model bundle from
ai.cribl.cloud. This is a download to your environment. No data about your events is sent in the request. - Usage analytics: Cribl receives anonymized, aggregate counts only, such as the total number of detections and tokens processed. These counts contain no raw events, no sampled events, no detected values, and no Pipeline names.
See Sensitive Data Before You Enable Guard
Cribl Guard runs a preliminary scan so you can see the sensitive data reaching your Destinations before you enable Guard. The scan gives you an idea of how much sensitive data flows and which types Cribl detects, which helps you decide where to enable protection.
The preliminary scan:
- Runs automatically, without a separate opt-in or a Commit & Deploy step.
- Does not accrue charges. Cribl does not bill you for this initial scanning.
- Reports counts and types only. The scan surfaces the number and Datatype of detections. It does not store or display raw sensitive values.
- Scans the
_rawfield only. The scan reads the_rawfield of each sampled event. Unlike the Cribl Guard Function, the scan has no Apply to fields setting, so you can’t extend it to other fields. If a sampled event has no_rawfield, Cribl scans the event’s remaining fields as serialized text instead. - Samples events after your Pipelines process them, on their way to the Destination. If a Pipeline parses
_rawinto structured fields and the sensitive data no longer appears in_raw, the preliminary scan does not flag that Destination, even though sensitive data still reaches it. To scan fields other than_raw, enable Cribl Guard on the Destination and set Apply to fields in the Cribl Guard Function. - Runs inference on the Leader Node. Worker Nodes capture the sampled events and send them to the Leader Node, which runs the NER model. Full background detection instead runs the model on each Worker Node.
The preliminary scan processes the
_rawfield of sampled events using a Named Entity Recognition (NER) model. It records only detection counts and Datatypes, never raw sensitive values, and does not send sampled events to an LLM or a Custom AI Provider. After you enable Guard, full background detection stores sampled event context to produce detailed findings, and Recommend Rules might send relevant samples to your configured AI provider. For what each Cribl AI feature accesses and how Cribl processes that data, see Cribl AI and Your Data.
When background detection is active, Cribl shows an in-product notice. Detection models sample data streams locally to surface privacy risks, and any Pipeline changes require your approval. Local detection keeps sampled data within your Cribl environment; the separate Recommend Rules step sends relevant samples to your configured AI provider only when you run it.
On the Guard homepage, the Status column shows Clear when Cribl finds no sensitive data for a Destination, or Sensitive data detected when it does. When sensitive data reaches Destinations that Guard doesn’t protect yet, Guard also shows a nudge banner (for example, Sensitive data is flowing to 3 Destinations) with an Enable All button to enable protection for all affected Destinations.
The preliminary scan gives you a limited preview. After you enable Cribl Guard on a Destination, background detection samples more data and returns fuller, more detailed findings.
Select a Cribl AI Model
Background detection uses a Cribl AI model to identify sensitive data. To choose the model:
- In your Cribl Workspace, select Cribl Stream.
- Open the Guard page. At the top of the page, find the Detection model drop-down. The drop-down appears on the Guard homepage only, not on the Detections page.
- Select a Cribl AI model from the drop-down. For details on each option, see About Cribl Guard Models.
- Select Commit & Deploy.
About Cribl Guard Models
Background detection uses a Cribl AI model to identify sensitive data. At the top of the Guard page, the Detection model drop-down lists the models available to your deployment:
| Model | Drop-down description | When to use it |
|---|---|---|
cribl-privacy-3.0 | Balanced | The default, and the best option for most users. It balances detection quality against throughput on mixed workloads. |
cribl-privacy-3.0-fast | Light and fast | High-volume telemetry, where scanning throughput and compute footprint matter more than detection depth. |
cribl-privacy-3.0-pro | More resource intensive but thorough | Workloads where detection depth and precision matter more than throughput. Pro uses the most compute of the three. |
Cribl publishes this catalog from ai.cribl.cloud, so the drop-down follows the current model family rather than your
Cribl Stream version. The version segment of each name changes when Cribl publishes a new family, for example from
cribl-privacy-2.0-fast to cribl-privacy-3.0-fast. If you never select a model, background detection uses the
Balanced model.
The Privacy 3.0 family sets a separate detection threshold for each entity type. An entity type is a kind of sensitive data that the model recognizes, and Guard reports it as a Datatype. Earlier families applied one threshold to every entity type, which is too aggressive for some types and too conservative for others, and that mismatch produces avoidable false positives. If a model reports values that aren’t sensitive in your environment, see Reduce False Positives.
In Cribl.Cloud Government, only the Balanced model is available. The control shows it as
a static cribl-privacy label instead of a drop-down.
These are not large-language models (LLMs). They are based on Named Entity Recognition (NER) models, which automatically scan text to identify and classify key information. The Cribl Guard AI models do not run data through any configured Custom AI Providers. Background detection uses Cribl-managed models only. You cannot connect a Custom AI Provider for background detection, and Cribl does not train these models on customer data. For more on how Cribl AI handles your data, see Cribl AI and Your Data.
What Changes When Cribl Updates the Models
Because Cribl publishes the catalog, the models in the Detection model drop-down can change without an upgrade on your side. A new model family shifts the balance between precision, the share of findings that are truly sensitive data, and recall, the share of sensitive data that the model reports. That balance sets how many findings you see, so your detection counts can move even though nothing in your configuration changed.
Privacy 3.0 traded some recall for higher precision on all three models, and raised throughput on all three, by the widest margin on Pro. For the measured results, see Cribl Guard Privacy Models 3.0.
Two things follow when the models change:
- Fewer findings don’t mean less coverage. Higher precision means more of what you see is real sensitive data. Lower recall means the model reports fewer values in total, so a Datatype that was noisy before the update can go quiet after it. Compare a Pipeline over a full sampling window before you conclude that detection stopped working.
- The cost of a model can change. Pro gained the most throughput in Privacy 3.0, so it gives up less throughput against Balanced and Fast than it used to. Revisit your choice of model after a family update.
To compare two models on your own data, run each one over a full sampling window on the same Pipeline, then compare the detections each one produces. Guard reports detection counts and sampled events rather than precision and recall figures, so use the counts and the sampled values to judge the difference.
Review and Act on Findings
This is the main workflow after background detection is on: see what was found, then apply rules or ignore the detection. Findings are scoped to one Worker Group at a time, so start by selecting the Worker Group you want to review.
Open the Guard homepage and select the Worker Group whose findings you want to review.
Open the Detections page for that Worker Group. Either:
- Select Review All in the Background Detections tile, or
- Select the yellow detections count in the Background Detection column for a specific Pipeline.
The page breadcrumb reads Guard > Detections. Select Guard to return to the Guard homepage.
Optionally, narrow the table. The search box matches the Datatype, Pipeline, and Destination of each detection, and the Select a Destination drop-down shows only the detections whose Pipelines feed one Destination. Despite the placeholder text, the search box matches neither dates nor the detected values themselves. To organize detections by date, sort on the date column instead.
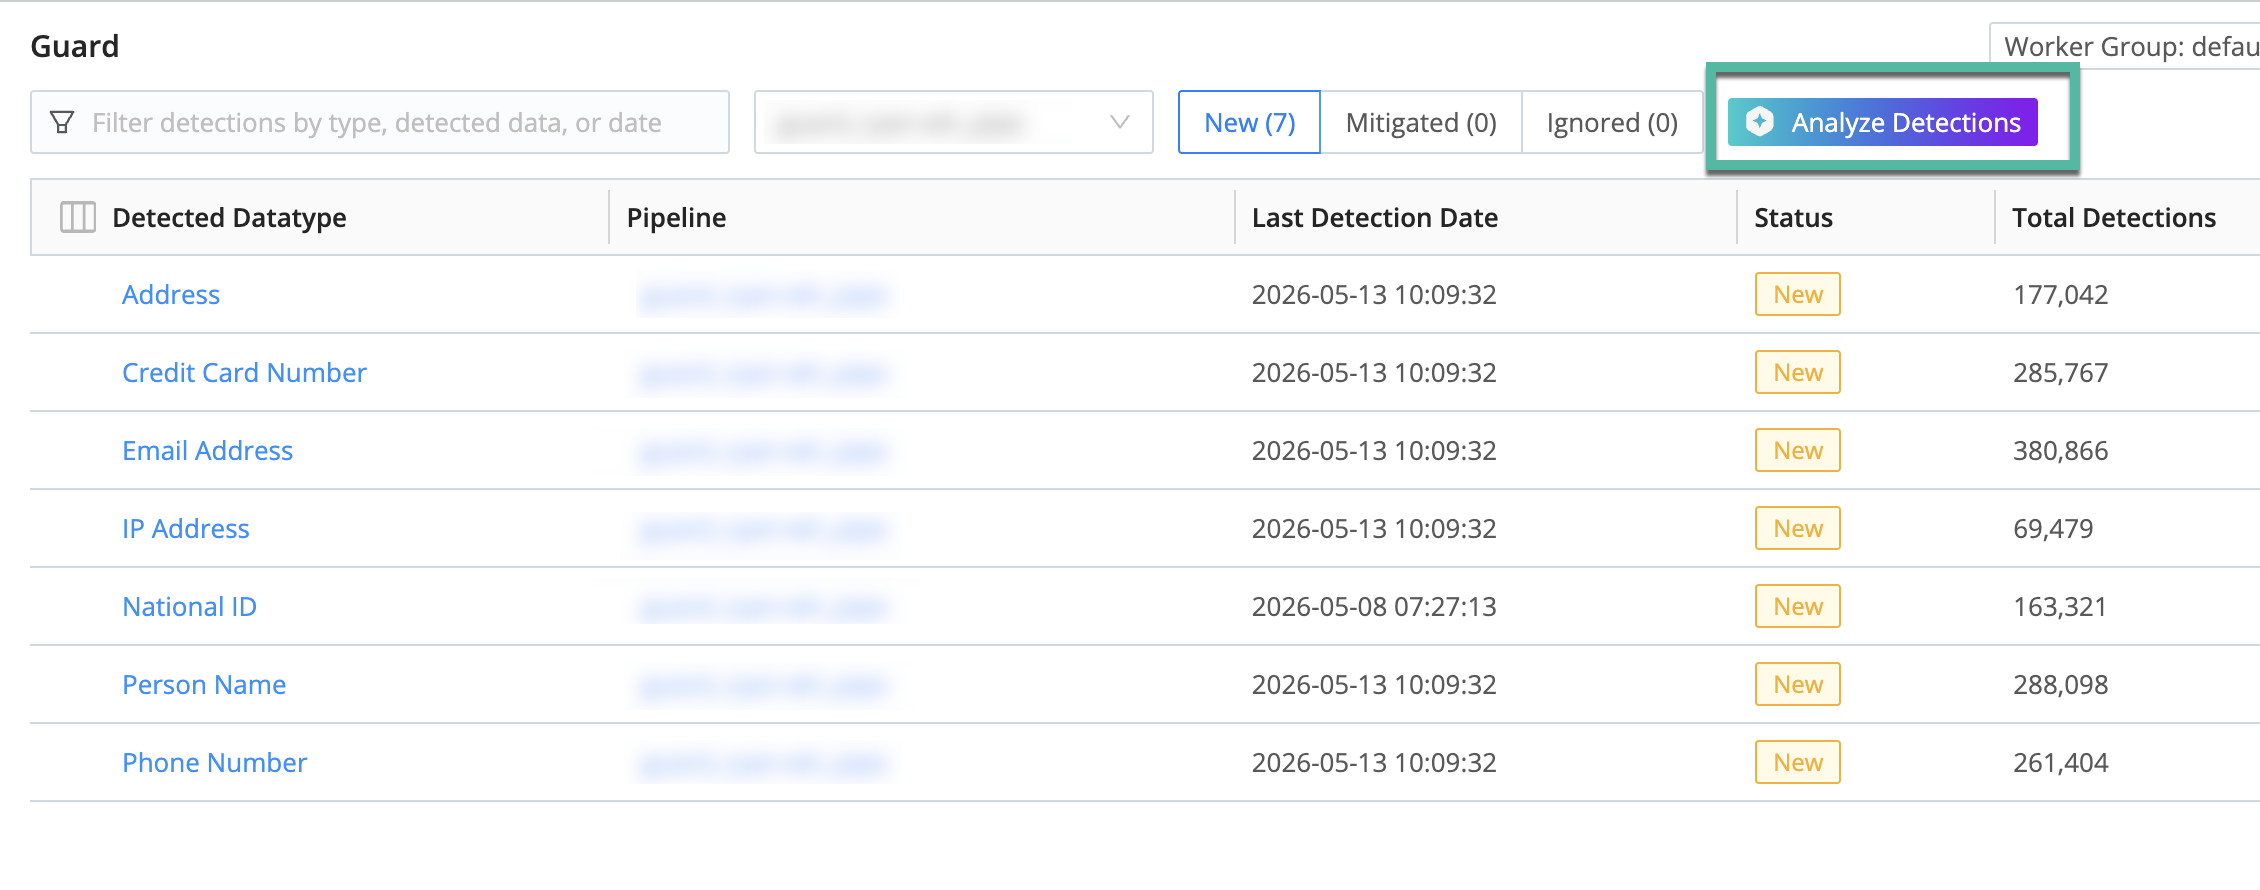
Review the type of data found. On the New tab, Cribl selects the first detection automatically and opens the details panel on the right, so the panel is never empty. Select another detection type (for example, IP Address) to review it instead.
The details panel stacks two areas. At the top, the Recommendations section lists the actions that Cribl AI suggests for this detection. At the bottom, the Sampled Events table shows the detected values, highlighted in context, with the number of samples next to its heading. Each event appears as a truncated snippet. Select Show full event to expand it, then Show less to collapse it again. This area also has a Delete Events button that removes the sampled events, available when the selected time range is at least one day.
Act on the detection, either by applying a recommendation or selecting from the three dots menu in the Actions column:
Review Detection: Opens the details panel for the detection, the same as selecting the row.
Apply Recommendations: Opens the details panel and immediately analyzes the last 24 hours of this detection, without waiting for you to start the analysis from the panel.
Ignore Datatype: Cribl ignores future detections for this PII type, recorded after you add the rule. Detections already recorded for this Datatype stay visible until they age out; Cribl retains detections for 7 days, then removes them automatically. In the Ignore Datatype modal:
- Under Apply to, choose this Pipeline, All Pipelines, or Custom to select specific Pipelines.
- Optionally, select a Reason for ignoring.
To stop ignoring a Datatype, open the Ignored tab and select Remove from Ignored from the row’s Actions menu.
Cribl marks a detection as mitigated for you once you apply the rules that cover it, then moves it to the Mitigated tab. There is no separate action to mark a detection as mitigated by hand.
Reduce False Positives
Background detection can flag a value that matches a sensitive data pattern but isn’t sensitive in your environment. Generic identifiers are the common case: an employee number or an internal account number has the same shape as a national ID, so the model reports it as one. Whether that matters is a judgment call, and organizations differ on whether to treat such identifiers as sensitive.
To cut the noise:
- Ignore the Datatype where it’s noisy. Select Ignore Datatype from the detection’s Actions menu, scoped to one Pipeline, All Pipelines, or a custom set. Cribl stops recording new detections of that Datatype, and you can reverse the choice from the Ignored tab.
- Apply the False Positive recommendation. When Cribl classifies a detection as a false positive, the recommendation card can carry a regex pattern that ignores only the matching values, so true positives for the same Datatype and Pipeline still surface.
- Switch to a model that favors precision. Pro has the strongest precision of the three Cribl Guard models. See What Changes When Cribl Updates the Models.
If false positives persist, contact Cribl Support with example records, so the team can tune detection for your data.
What the Detections Table Shows
The Detections table lists one row per Datatype and Pipeline combination. All three tabs show the Detected Datatype, the Pipeline, and the Destination that the Pipeline feeds, with an icon for the Destination type. When several Destinations share a Pipeline, the table shows the Destination you filtered on, or the first match when you have no filter set. Each tab label carries a count of the detections it holds, for example New (17). The remaining columns depend on the tab:
| Tab | What it lists | Extra columns |
|---|---|---|
| New | Detections that need review and action. | Last Detection Date, Actions |
| Mitigated | Detections you addressed with a Guard rule or another mitigation. | Mitigated Date, Total Detections |
| Ignored | Datatypes you chose to ignore. | Ignored Date, Actions |
Select a column heading to sort by it. Every column sorts except Actions.
Write a Rule by Hand with Copilot
When you don’t want any of the recommended rules, hand the detection to Cribl Copilot instead. In the Recommendations section header, open the More recommendation actions (three dots) menu and select Generate Rule with Copilot.
Copilot opens with the sampled events and a prompt to create a Guard rule for the detection, then proposes a rule with a name, regex pattern, and description. Review the proposed pattern against the sampled events, then save the rule to a Scanning Ruleset. To activate the rule, select Commit & Deploy from the save confirmation. Creating the rule alone does not protect data. Once the rule is activated, it masks matching sensitive data in future events.
How the Details Panel Tracks Your Selection
On the New tab, the details panel always reflects a selected detection:
- Cribl selects the first detection in the filtered list automatically, so the Recommendations and Sampled Events areas are populated when the page loads.
- When you apply or ignore everything for a Datatype and its row leaves the New tab, Cribl selects the next detection in the list.
- When no detections remain on the New tab, Cribl hides the panel.
- Switching to the Mitigated or Ignored tab closes the panel.
To hide the panel while detections remain, use the collapse control on its left edge. There is no separate close button.
Recommended Actions
Cribl Guard analyzes recent detections and suggests how to act on each one. When you select a detection type, the suggestions appear in the Recommendations section. This section sits at the top of the details panel, ahead of the sampled events. Cribl groups the suggestions into cards, one per ruleset, and each card pairs the detection with an action that Cribl AI suggests.
When you open the Detections page and select the New tab, Cribl loads recommendations for your recent detections. If a detection does not have recommendations yet, run the analysis yourself from the Recommend Rules split button. The section header shows when Cribl last analyzed the detection and includes an information tooltip that explains the suggestions.
The section header holds the actions that apply to the whole detection: Apply All, plus a More recommendation actions (three dots) menu containing Generate Rule with Copilot and Ignore Datatype.
If you’re using a custom AI model, Cribl Guard runs the analysis through the model you selected. If not, Cribl analyzes your data using the in-house, Cribl-managed model. For more information, see Custom AI Providers.
To review and apply recommendations:
- Open the Guard homepage and select the Worker Group whose findings you want to review.
- Go to the Detections page (for example, select Review All in the Background Detections tile or open detections from a Pipeline detection count), then select the New tab.
- Select a detection type to open the details panel. The Recommendations section lists the suggested actions for that detection.
- Apply the recommendations:
- Select the action button on a single card (for example, Apply Ruleset, Create & Apply, or Mark as Ignored). See Recommendation Types.
- Select Apply All in the section header to apply every card for the detection, one after another.
- Select Dismiss on a card to hide it without applying it.
- To ignore future detections of the same Datatype, or to hand the detection to Copilot, open the More recommendation actions (three dots) menu in the section header and select Ignore Datatype or Generate Rule with Copilot.
Recommendations are available only in the product while you review a detection. Cribl does not save them as a separate downloadable report or history entry.
What Each Recommendation Shows
Cribl groups the recommendations for a detection into cards, one card per ruleset. The card header shows the ruleset name and its action button. Beneath the header, the card lists each recommended rule with the regex pattern it uses. Check that pattern against the sampled events to confirm it captures the intended PII.
Cards carry a tag that tells you where the ruleset comes from:
- Cribl: A ruleset from the out-of-the-box Guard Rules Library.
- Custom: A ruleset that users in your Workspace created. Cards that propose a new rule always carry this tag, and each proposed rule also carries a New Rule tag.
A card with no tag means Cribl could not resolve the ruleset’s origin.
A false-positive recommendation appears on its own card, titled False Positive, that shows why Cribl suggests ignoring the detection. A Pipeline and entity combination can contain both true and false positives. In that case, the recommendation can include a regex pattern, so Cribl ignores only the matching values and keeps the true positives.
A single detection can produce more than one card. For example, Cribl might link an existing ruleset for the samples it already covers and propose a new rule for the rest. Each card has its own action button, so you can apply them independently.
Validate a Recommendation
Before you apply a recommendation, confirm that its regex captures the data you want to protect:
- In the detection details panel, select the radio button next to a rule. The section prompts you with Select a rule to preview matches in Sample Data.
- Review the Sampled Events below the recommendation. Cribl highlights the matches for the rule you selected.
- Confirm that the highlighted matches correspond to the sensitive data you expect to protect.
- If the pattern is too broad or too narrow, select Dismiss to hide the card, then create a custom Guard rule instead.
Choose a Look-Back Window
When a detection has no recommendations yet, the Recommendations section shows a Recommend Rules split button. The button you choose sets how far back Cribl looks for detections to analyze:
| Control | Look-back window |
|---|---|
| Recommend Rules (last 24h), the primary button | 24 hours |
| Recommend Rules (all detections), in the More recommend options menu | 30 days |
Start with Recommend Rules (last 24h), because a narrower window returns results faster. Use Recommend Rules (all detections) when the last day holds too few samples to work from.
To open the menu, select the chevron next to the primary button. The menu lists both windows, so you can also start the 24-hour analysis from there. The Apply Recommendations row action and the Try Again button both use the 24-hour window.
Detections outside the window you choose are not analyzed. They still appear in the Detections table, but they don’t receive recommendations. The scheduled analysis that Cribl runs across the whole Worker Group uses a 24-hour window.
Separately from the look-back window, Worker Nodes keep sampled events for a limited time. Once a detection’s sampled events age out, Cribl can’t analyze it, even when the detection is inside the window. Background detection must capture a fresh sample first.
If you drive the analysis through the API, POST /ai/guard/mitigation-job accepts a sinceHours query parameter that
sets the look-back window in hours. If you don’t specify sinceHours, the default window depends on the job’s scope:
jobs scoped to both a Pipeline and a Datatype use 720 hours, and all other jobs use 24 hours.
Analysis States
The Recommendations section reflects the current analysis state:
| State | What you see |
|---|---|
| Generating | Generating recommendations, with the note that analysis is in progress and may take several minutes. |
| Loading | Loading recommendations… while Cribl refreshes suggestions for a detection that already has some. |
| Ready | Recommendation cards appear in the details panel, each with its own action button. As you apply or dismiss cards, Cribl removes them from the section. |
| Partially analyzed | A warning that some sampled events could not be analyzed. Cribl lists the recommendations it did produce below the warning. |
| No recommendation | No recommendation generated, with the analysis summary explaining why Cribl could not propose a rule, and a Try Again button. |
| Failed | Recommendations could not be generated, with a Try Again button. |
| Samples expired | A message that the sampled events for this detection have expired, and that you need a new sample to receive recommendations. |
| No sampled events | Recommendations are not available for this detection, because no sampled events remain to analyze. Use Generate Rule with Copilot to write a rule by hand instead. |
| All dismissed | There are no more recommendations for this Datatype. Cribl notes that you dismissed them all but can still generate rules manually, and offers Generate Rule with Copilot. |
| Not analyzed yet | Recommendations are not yet available for this detection, with the Recommend Rules split button. |
Recommendation Types
Each card includes an action button. The button label and behavior depend on the recommendation type:
| Recommendation | Description | Action button | What it does |
|---|---|---|---|
| New rule | The detection is a good candidate for a new regex-based Guard rule. The card shows the proposed rule name, a New Rule tag, and the regex. | Create & Apply | Creates the rule in your Knowledge objects and adds it to the Pipeline ruleset. |
| Existing ruleset | A ruleset that matches the detected data already exists. The card shows the ruleset name and the regex of each rule in it. | Apply Ruleset | Adds that one ruleset to the Pipeline that contains the detected data. |
| False positive | The result matches a sensitive data pattern, but the actual data is not sensitive. | Mark as Ignored | Moves the detection to the Ignored tab. When the samples mix true and false positives, the recommendation can include a regex pattern so Cribl ignores only the matching values. |
Every card except False Positive also has a Dismiss button. Dismiss only hides the card. It does not add a rule, and it does not mark the detection as mitigated.
Cribl adds only the ruleset on the card you applied. A Guard rule can belong to several rulesets. For example,
Visa Card (4x4 digits)belongs to bothFinancial_UnitedStatesandFinancial_Global. Apply Ruleset attaches only the ruleset named on the card, so applying one recommendation no longer attaches every ruleset that contains the rule. To attach the others, apply their cards too.
Cribl marks the detection as mitigated only after you settle every pending recommendation on it with a rule-based action. Dismissing the remaining cards does not mitigate the detection.
If Cribl can’t load an existing rule’s details, it reports an error and disables Apply Ruleset and Apply All for that card. Dismiss still works.
Scope and Limitations
Keep the following in mind as you review findings:
- One Worker Group at a time: Findings are scoped to the selected Worker Group. To review findings for a different Worker Group, select it from the Worker Group selector. There is no cross-group aggregate view.
- All detections appear: Background detection samples events after Guard rules on that Pipeline run, so it is designed to find sensitive data those rules miss. The Detections table still lists every detection type that the NER model surfaces, including Datatypes that already have a Guard rule elsewhere (for example, a rule in Knowledge that is not attached to this Pipeline). There is no filter to show only detections that have no matching Guard rule.
- Preliminary scan is a preview: The preliminary scan reports detection counts and Datatypes, but does not provide raw sensitive values or a rule-by-rule comparison of what Guard would catch. It gives you a high-level sense of the sensitive data in your environment before you enable protection. Full background detection provides fuller, more detailed findings.
- Preliminary scan reads
_rawonly: The preliminary scan scans the_rawfield of each sampled event, and you can’t configure it to scan other fields. If a Pipeline moved sensitive data out of_rawand into structured fields, a Destination can show Clear even though that data still reaches it. To scan those fields, enable Cribl Guard on the Destination and set Apply to fields in the Cribl Guard Function. - 7-day retention: Cribl retains detections for 7 days, then removes them automatically.
- Recommendation look-back window: Cribl generates recommendations only for detections inside the look-back window you choose, at most 30 days. Older findings still appear in the Detections table, but do not receive recommendations.
Alerting and Notifications
Background detection does not support configurable alerts or notifications. The detection count indicators on the Guard homepage and the Pipeline configuration page link you to the Detections page, but they are not configurable alerts. To check for new findings, review the Detections page periodically.
Refine the Scope of Background Detection
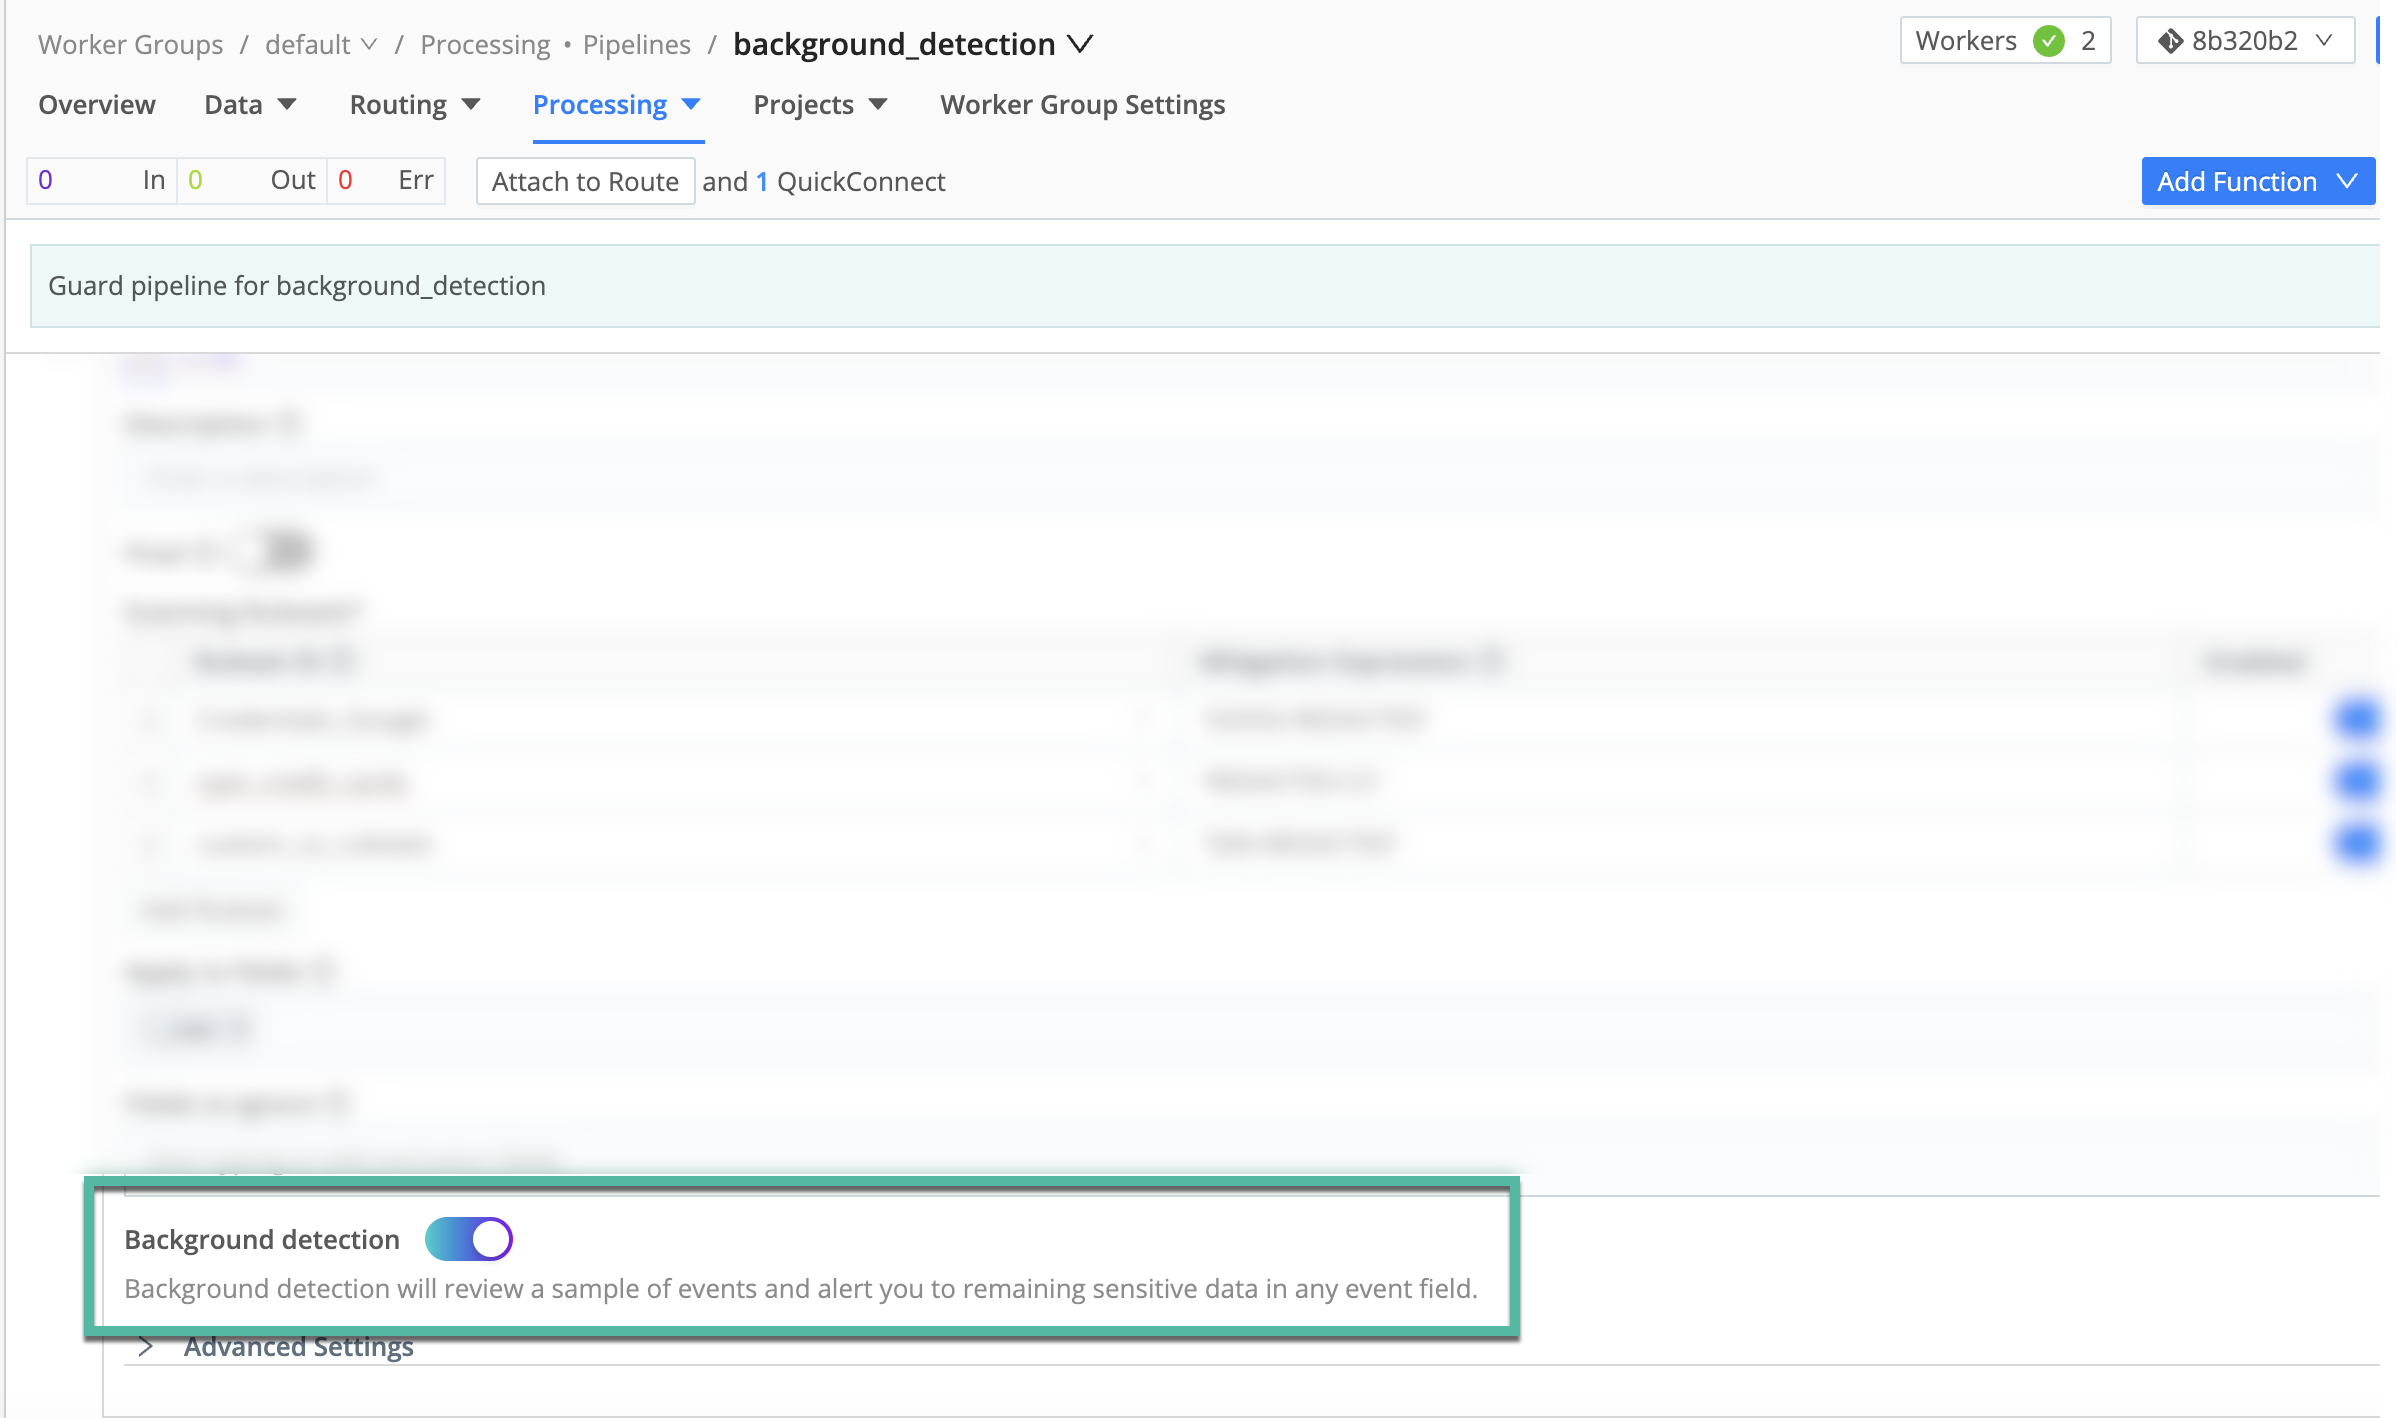
Background detection runs as part of Cribl Guard, but you can control where it runs per Pipeline. Use the Background Detection toggle in the Cribl Guard Function to include or exclude a Pipeline.
Turn Off for Specific Pipelines
To exclude Pipelines that carry highly sensitive or constrained data:
- Open the Worker Group, then Processing > Pipelines and the Pipeline with the Guard Function.
- Expand the Cribl Guard Function and toggle Background Detection off.
- Select Commit & Deploy.
When background detection is off for a Pipeline, PII in that Pipeline doesn’t get a Guard mitigation rule and doesn’t appear as a detection on the Guard page.
Why Use Background Detection?
| Benefit | Description |
|---|---|
| Find unknowns in your data | Catches sensitive data that existing Guard rulesets missed (new types, sources, formats) before it reaches Destinations. |
| Better compliance and reporting | One place to see new findings, open issues, and past remediations. |
| Faster path to protection | Findings are surfaced automatically; you choose whether to ignore or mitigate (e.g., by creating a Guard rule). |
Common Use Cases
| Use Case | Stream User Persona | Description |
|---|---|---|
| Prove and improve data risk posture | CISO & CIO | Continuously see where new PII, secrets, or regulated data enter telemetry; show that Guard catches previously unknown patterns and keep an evidence trail after remediation. |
| Continuous protection for high-risk Destinations | Compliance / Observability | Use background detection on high-value Destinations (SIEM, data lake, observability, ticketing) to ensure unintended PII doesn’t reach them as Pipelines change; adjust Guard rules or routing when detections appear. |
| Monitor schema and data drift | Operators | Use findings as a signal when upstream teams add fields, change formats, or onboard apps; tune Guard rulesets or Pipeline filters instead of manually checking after every change. |
| Internal reporting and audits (Auditors / Risk) | Auditor & Risk Management | Export or summarize detections to report where sensitive data was found, how fast it was remediated, and what guardrails were added, for risk reviews, third-party assessments, and due diligence. |